What Tools Are Needed for Self-Leveling Flooring?自流平地面施工需要哪些工具?
English Version
What Tools Are Needed for Self-Leveling Flooring?
A smooth and durable self-leveling floor depends not only on the material but also on proper surface preparation, accurate mixing and the correct application tools.
Using the wrong tools can lead to bubbles, uneven thickness, visible marks, poor adhesion or premature cracking. Whether you are installing cement-based self-leveling underlayment or another flowable flooring system, preparing the necessary tools before mixing begins will make the installation faster and more consistent.
This guide covers the essential tools needed for professional self-leveling flooring installation.
1. Personal Protective Equipment
Before starting, prepare suitable personal protective equipment. Self-leveling materials may contain cement, polymers or other chemical components that can irritate the skin, eyes and respiratory system.
Recommended protective equipment includes:
- Safety glasses or goggles
- Chemical-resistant gloves
- Protective work clothing
- Safety boots
- Knee protection when necessary
- Suitable respiratory protection
- Hearing protection when grinding the substrate
Always follow the material manufacturer’s safety data sheet and site safety requirements.
2. Concrete Grinder
The substrate must be clean, solid and properly profiled before applying self-leveling material.
A concrete grinder can remove:
- Old coatings
- Paint
- Adhesive residue
- Weak surface layers
- Dirt and contamination
- Minor high spots
Mechanical grinding also creates a suitable surface profile, helping the primer and self-leveling material bond to the substrate.
For smaller areas, a handheld grinder can be used around corners, edges and difficult-to-reach positions.
3. Industrial Vacuum Cleaner
After grinding, the floor must be thoroughly cleaned. Dust left on the surface can reduce adhesion and lead to delamination.
An industrial vacuum cleaner should be used to remove:
- Concrete dust
- Loose particles
- Sand
- Debris
- Material around cracks and edges
Avoid relying only on sweeping, as fine dust may remain on the substrate.
4. Moisture Meter
Excessive moisture in the substrate can cause bonding problems, bubbles or floor failure.
A moisture meter helps evaluate the condition of the concrete before installation. Depending on the flooring system, additional professional moisture testing may also be required.
Always compare the test results with the limits specified by the material manufacturer.
5. Crack-Repairing Tools
Cracks, holes and damaged areas should be repaired before applying primer and self-leveling material.
Useful repair tools include:
- Scrapers
- Filling knives
- Pointing trowels
- Caulking guns
- Repair mortar tools
- Edge sealing materials
Open joints, gaps and holes must be properly sealed to prevent the liquid material from leaking.
6. Primer Application Tools
Most self-leveling systems require a compatible primer. Primer improves adhesion, controls substrate absorption and helps reduce air bubbles.
Common primer application tools include:
- Microfiber rollers
- Brushes
- Squeegees
- Paint trays
- Measuring containers
Apply the primer evenly without leaving puddles. Corners and edges can be completed with a brush.
The primer must be compatible with both the substrate and the self-leveling material.
7. Clean Mixing Buckets
Use clean, heavy-duty buckets with enough capacity for the recommended batch size.
The buckets should be:
- Free from cured material
- Strong enough for mechanical mixing
- Clearly marked when measuring water
- Large enough to reduce splashing
For continuous installations, prepare several buckets so one batch can be mixed while another is being poured.
8. Water-Measuring Container
Cement-based self-leveling products require an accurate amount of clean water.
Too much water can reduce strength, increase shrinkage and cause material separation. Too little water may reduce flow and make the floor difficult to level.
Use a marked measuring container or water-dosing system. Never estimate the water quantity by eye.
9. Heavy-Duty Mixing Drill
A powerful, low-speed mixing drill is needed to produce a consistent mixture.
The drill should have enough torque to mix the material without excessive speed. Mixing too quickly can introduce unnecessary air into the compound.
For larger projects, contractors may use:
- Continuous mixers
- Mixing stations
- Pumping systems
- Mobile mixing equipment
These systems improve efficiency and help maintain consistent mixing between batches.
10. Mixing Paddle
Use a mixing paddle designed for self-leveling compounds, mortar or flooring materials.
The correct paddle helps:
- Break up dry lumps
- Mix powder and water evenly
- Reduce unmixed material at the bottom
- Produce a consistent, flowable compound
Move the paddle around the bucket while keeping it below the material surface to reduce air entrainment.
11. Gauge Rake or Adjustable Spreader
A gauge rake helps distribute the self-leveling compound at a controlled thickness.
Its adjustable pins or guides allow installers to set the required application depth. This is especially useful when the project requires a consistent layer across a large area.
The rake should spread the material without scraping directly against the substrate.
12. Smoothing Trowel
A smoothing trowel is useful for:
- Guiding material into corners
- Joining adjacent pours
- Finishing around edges
- Correcting small surface irregularities
- Working in narrow areas
The trowel should be used gently. Excessive troweling may leave marks or disturb the natural flow of the compound.
13. Spiked Roller
A spiked roller is used immediately after spreading the self-leveling material.
It helps:
- Release trapped air
- Reduce surface bubbles
- Blend adjacent batches
- Improve the uniformity of the finish
- Assist the material’s natural flow
Select the roller spike length according to the application thickness. If the spikes are too short, the roller body may push the material instead of releasing air.
Do not continue rolling after the material begins to set, as this may leave permanent marks.
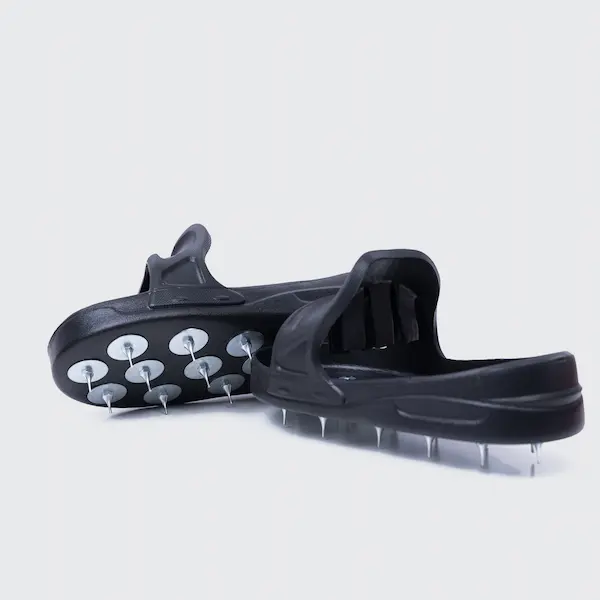
14. Spiked Shoes
Spiked shoes allow installers to walk across freshly applied self-leveling material while using a gauge rake, smoothing trowel or spiked roller.
They distribute the installer’s weight across multiple small spikes, reducing disturbance to the wet surface.
Professional spiked shoes should have:
- A stable platform
- Secure straps
- Evenly installed spikes
- A suitable spike length
- A good fit over work boots
Walk slowly, use short steps and lift each foot vertically. Do not slide the spikes across the material.
15. Self-Leveling Height Gauges
Height gauges help installers establish and monitor the required floor thickness.
They are especially useful on larger projects where maintaining a uniform level is important. The gauges can be positioned at different points across the floor before pouring begins.
This makes it easier to identify low areas and control material depth during application.
16. Edge and Detail Tools
Large tools cannot reach every area. Prepare smaller tools for walls, columns, doorways and corners.
Useful detail tools include:
- Small trowels
- Brushes
- Scrapers
- Margin trowels
- Utility knives
- Sealant guns
These tools help produce a cleaner finish around obstacles and perimeter areas.
17. Level and Measuring Equipment
Before pouring, inspect the substrate and determine the required application depth.
Common measuring equipment includes:
- Laser level
- Spirit level
- Straightedge
- Tape measure
- Depth gauges
- Marking tools
A laser level can help locate high and low points across large rooms.
Recommended Tool Sequence
A typical self-leveling installation follows this sequence:
- Inspect and test the substrate.
- Grind or mechanically prepare the surface.
- Repair cracks, holes and open gaps.
- Vacuum the floor thoroughly.
- Apply the specified primer.
- Measure water accurately.
- Mix the self-leveling compound.
- Pour and distribute it with a gauge rake.
- Finish edges with a smoothing trowel.
- Use a spiked roller to release trapped air.
- Wear spiked shoes when movement across the wet material is necessary.
- Allow the floor to cure according to the manufacturer’s instructions.
Common Tool-Related Mistakes
Avoid these common installation mistakes:
- Mixing by hand instead of using a suitable drill
- Adding extra water to improve flow
- Using dirty buckets or tools
- Applying material without substrate preparation
- Using an incompatible primer
- Selecting the wrong roller spike length
- Walking on wet material without spiked shoes
- Working after the material’s usable time has expired
- Starting before all tools and materials are ready
Self-leveling compounds often have a limited working time, so delays can create visible joints between batches.
Final Thoughts
The essential tools for self-leveling flooring include surface preparation equipment, a powerful mixing system, clean buckets, accurate water-measuring tools, a gauge rake, smoothing trowel, spiked roller, spiked shoes and height gauges.
Having every tool ready before mixing begins is critical. Once the compound is mixed, installers must work continuously and efficiently.
The correct tools help control material thickness, release trapped air, reduce surface defects and create a smoother, more professional floor.